Figure gallerys

11/12/2011

More samurai terrain

For today I've only got one thing to show, and it is a rural hillside graveyard which will be used for next years SALUTE board.

The basic shape was roughed out of yellow insulation foam and cork bark (where would we be without this!) which was placed randomly to look nice and to create a smaller profile that another hill wouldn't.

The base is 6mm MDF with a slight chamfer on it and everything was stuck together with a  hot glue gun (probably the best option for doing this sort of terrain.

The hill and ground were then sanded as per normal and then inked with watered down Windsor and Newton Peat ink.The rocks were also inked and one of the many good things about cork bark is the variety of colour that it has.

The graves were already stuck in place (but only undercoated) so a little care was needed in sanding around them but it didn't matter so much for the ink as it will add to the overall effect. (the black circle is a pen mark for the torii but I decided to leave it off).


The next stage was to drybrush the whole area and this was done with cheap artists acrylics and a rather large but soft brush. I generally go up in three colours of lightening tones for the drybrushing as it helps to bring the details and contours out, the rocks were drybrushed with varying greys and then some areas were washed over with a greeny/brown ink.

The groundwork was done as normal, using three different types of flocking, one was fine and is for normal open ground. Another is small grade sponge foam (differing colours) and the third is a special mix that I use for treed areas.

Trees can be added or removed quite easily as during the initial construction process I placed tubes at random intervals all over the hillside and kept them free or debris so the trees (which all have bare wire 'trunks') can be put in any order or type that I have from the box..

The graves were painted individually in different shades of warm greys and the names of who is buried there were written on with a fine line technical pen.

That's about it from me, I'll leave you with some more beauty shots :-)
ttfn


27/11/2011

Starting for SALUTE 2012

Well, I've been getting bits and pieces done for a while now but now I've started in earnest.

This years samurai board will consist of the outskirts of a town, a fair few hills, a bit of a river, some of the terrain that has already appeared on here (namely the roadside shrine) and if I have time a corner yamashiro, tall but compact.

The town will be sized down in reference to the ground scale (what I mean here will become clear in time) but most of the elements will be present.

Every Japanese town of the period would have samurai mansions and residences as part of their makeup. I've chosen the easy way out for this table and I'm only going to show the outer walls/ancillary buildings.

Basically, the town would have the richer, more influential people (generally samurai or high court officials etc) towards the centre and the poorer, merchant types towards the suburbs (merchants were treated as a lower class of person in the period) including the retainers etc. This of course wasn't a hard and fast rule but quite common.

I'm going for a mix of the different areas with the higher class buildings on one edge of the boards and the lower class buildings encroaching into the board itself.

For the buildings shown they are just about done apart from the tiles roofs on the entrance and long storehouse. This will be done this week.

I will also be doing some plans of the table layout to help me along the way and when done I'll post them up here.

For the actual town I will be making urban boards (again, shown on here when done) and I hope to have a few vignettes in various places to give character.

For most of the normal buildings I'll be using items from my catalogue but there will be a few special ones thrown in to break it up a bit. The table itself will be 12x6 and the fight will be happening along the length instead of the width. The idea being that the attacking troops will be coming in from the mountains and the defending troops coming through the town. All will be made clear later :-)

ttfn

30/10/2011

28mm Victorian modular warehouse

Two posts in one weekend, I must be going mad...

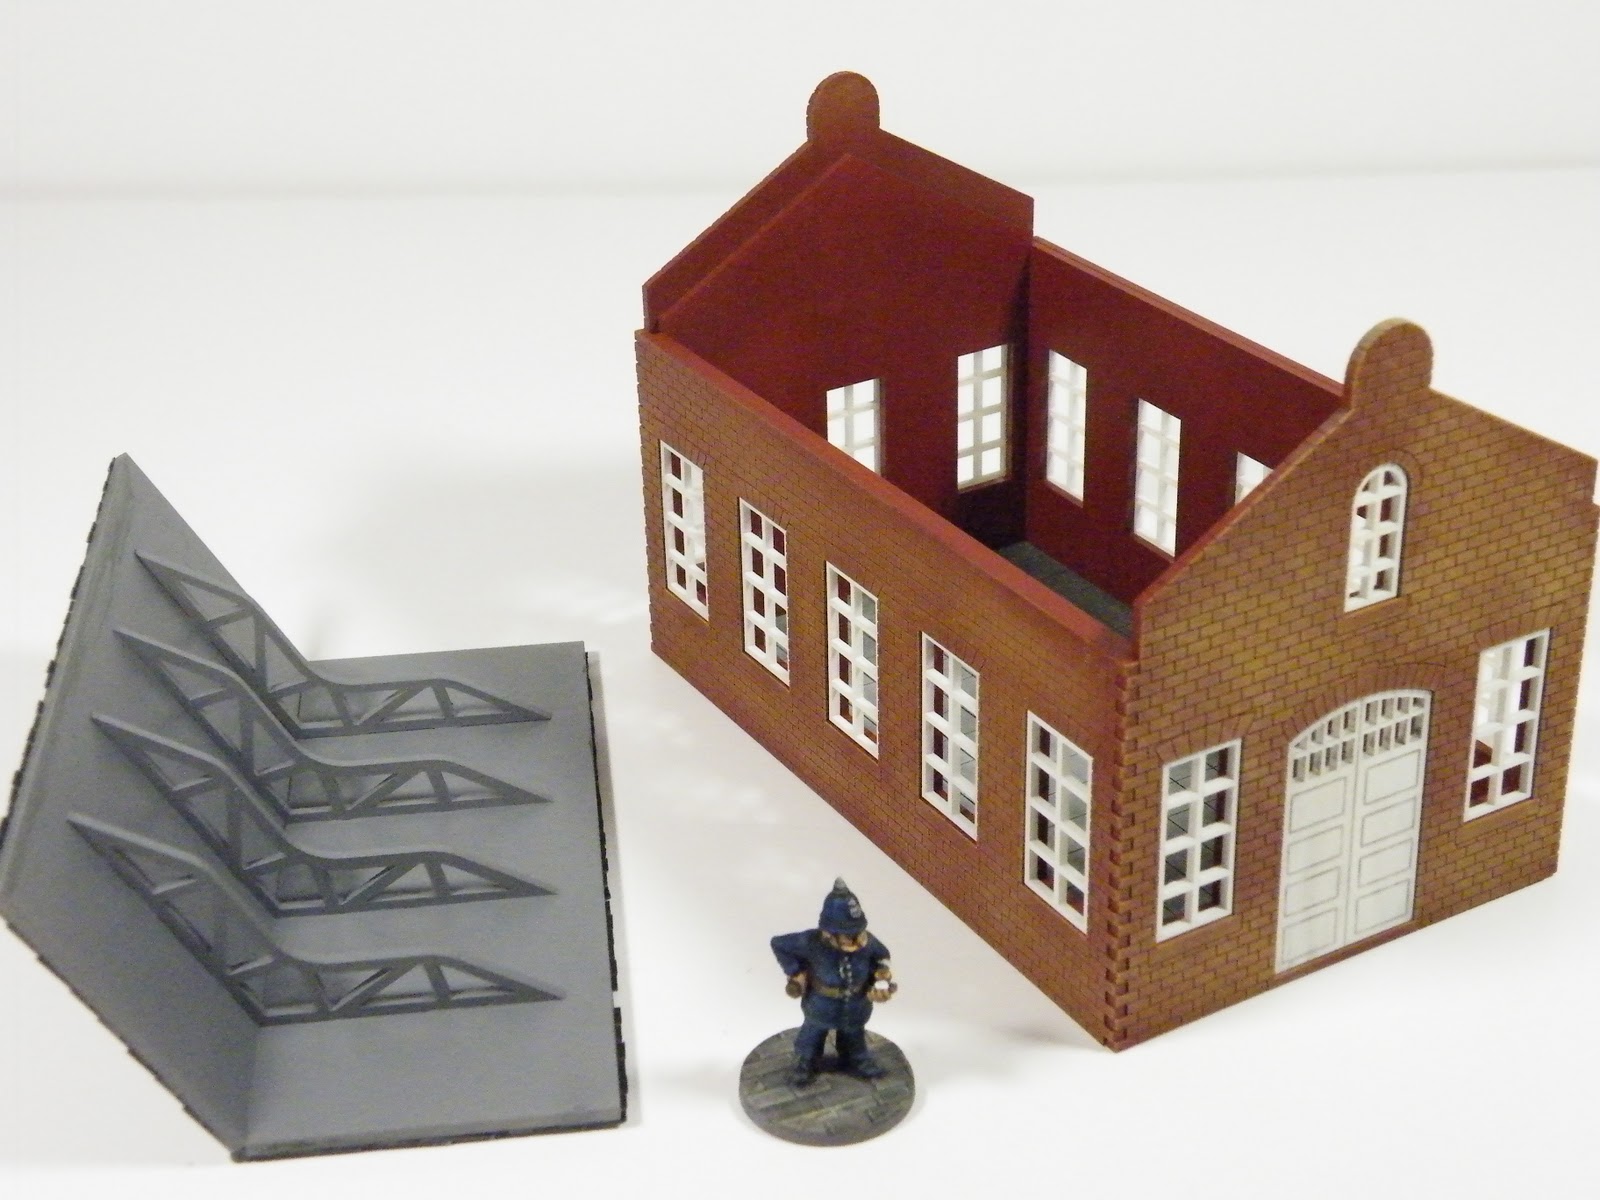
I've been working this out for a few weeks now and here is the result, a modular Victorian warehouse kit that's all ready to go (unassembled of course). As you can see form the picture to the right all the bits are there and come ready primed.

Included in the kit are the parts as follows. Front, back and side walls, roof plates and struts (including guide lines for the placement of tiles), a floor plate that sits inside the walls, door and windows (spare windows) and a sheet of tiles (enough for one roof).

The walls are designed so that they will join 'seemlessly' together and the window/door recesses have a slight ledge all the way round to support the said windows/door.

It is possible to make a larger version using two kits and I will post a little post on that in the near future.

The brick and door detail is recessed so there will be no lack of detail once it's painted. I do recommend using a spray basecoat and then normal drybrushing on top to get the desired effect.

The photo to the right shows the scored detailing a bit closer so you get an idea.

I have plans for different types of windows and doors in the near future that can be bought as a separate bundle and there will be other expansions also.

I will also be making lots of other types of building to go with this one and most of them will be able to be made together in some way (wall swaps, extensions etc).

The painted version I did quickly last night just to show the detail in a better light. Obviously this one is typical brick red but have a look in Google images for 'Victorian brick colours' to get an idea of the tones and hues available.

I will eventually be doing one in 'London stock' which is the yellowy/cream colour found in London and the surrounding area. Of course the roof can be left removable so as to have interior access and the door/windows can be left loose (or blu-tacked in place) to allow for the simulation of damage etc.

This is available now but won't be on the website for a while yet so if you fancy one then just e-mail me :-)

Well, that's all for now, I have a gaming weekend of games, food, beer and madness to get ready for next week :-D

ttfn

28/10/2011

28mm Yamashiro is ready

The modular yamashiro is finally ready to sell and it will be going on the website next week.

First off is the gateway, nice and simple as mentioned in a post below. This section is 150mm long like the straight sections already available and is about 100mm high. The gap under the gatehouse is approx 45mm.

The next two sections are both 60 degree corners, one internal and one external. I have started on the masters for 30 degree corners but these won't be ready for a while yet.

One of the options that will be on the website proper is a set of one gateway, two external corners and two straight sections. There will also be an expansion of more straights and internal corners but that yet to be finalised.

The set option is shown on the left and although it won't fit flush with a table edge I don't think this will be a problem.

The buildings in the yamashiro section will also be available in a set and there are more waiting in the wings to be finished off.

I also have plans for a few other sections which I think I mentioned in a previous post but I'll mention them again.

There will be a integrated wall building (used either as a store room or barracks), a corner tower but the size is no where near decided yet. There will also be a small tenshu or keep and a slightly larger barrack building.

I'm also thinking of an openwork watchtower but that's a fair way off yet.

ttfn


15/10/2011

More ashigaru for Caesar?!?

Just a small post today of my second Hail Caesar samurai forces.

These boys are Sanada clan and there are five bases for my typical unit frontage but not all of them have four figures on. The figures lend themselves to have a bit of disorganisation and so several of the bases only have three figures on them.

I'm thinking I might employ this more often as it would save a little bit on figures and give them a more 'authentic' look.

The banner was hand painted again along with the mon on the jingasa. I left the sashimono blank as this seemed to be the case for quite a few ashigaru units (well, according to a couple of Japanese books I've got).I will, at some point, set up a decent photography area in my room as my camera skills leave a lot to be desired :-/ However, in the mean time, these will have to do.

I've got the next unit primed and mounted for painted but I probably won't touch them for a while as I've got a few commissions to get cracking on with.


ttfn

09/10/2011

Hail Caesar samurai.

Well, samurai and ashigaru.

I've finally finished my first proper unit for Hail Caesar (as opposed to re-basing existing figures).

The clan is Myoshi which, along with Sanada, are going to be my main clans for the time being. There are so many that it does become difficult to pick between them.
There are five bases in total and I think that will be the norm for nagai-yari ashigaru (pikes). For the teppo and yumi (arquebus and bow) armed troops I'll be doing four bases with a smaller amount of command.

I still have the nobori to do (two off) and I'm torn between hand painting or printing and touching up.

I'm also working on a divisional command base for my Sanada (already got one for the Myoshi, see an earlier post).

I have enough troops for a small division (two pike and one arquebus) and when I get them back I'll be re-basing them all and then, then I'll be able to have a game. Still got to sort out the tweaks for the rules which I'll get round to over the next few weeks or so.

Below are some pictures of existing figures that I'll leave you with to enjoy :-)

ttfn


25/09/2011

Paddy fields

It's been a while but I haven't been slacking, I've been a bust little bee and tonight there's something to show :-)

Having been to Japan several times and seeing the layout of the general landscape (countryside that is, not the urban areas), I've noticed that paddy fields (or tambo) are quite often found on the sides of foothills sloping up to the hills proper so I thought I would make one for the table top.

Quite simple construction really, hardboard base with 25mm insulation foam layers. You've heard it called 'blue' or 'pink' foam but this stuff is actually a strange mustard colour :-/

The foam was roughly cut to shape (three layers, each smaller than the one below) and stuck together. The paths were then cut in because I wanted to get them in the right place to get the 'feel' of the location right and it was easier to do this with all the layers stuck together.

The field borders were made from 2mm thick card cut with a bevelled edge and filled smooth with normal household filler. The whole lot was given a quick sand down to get rid of the worst lumps and then everything apart from the fields themselves were sanded as normal.

I unfortunately didn't take any photos of the intervening stages but it's the same sort of process that I implement on most of the other terrain I make.

The fields themselves were painted with a very dark green and highlighted around the edges and corners. They were then given a coat of yacht varnish and will be given more when the first coat has gone off. The more coats you can put on the better as it really adds to the depth of the water.

At some point in the near future I shall get my boards out and do a sort of photoshoot but enough yammering form me, more photos below :-)


ttfn

28/08/2011

28mm Samurai terrain (roadside shrine)

Aha, two posts today? Hell yeah!

Well, I've been off all week with nasty germs and so have had a bit of time (not much though as my wife has been keeping tabs on me) to make things :-)

For the samurai I thought it was about time to make something a bit more than stand alone and so the thought of a roadside shrine to into being.

I wanted to use items that are available from the catalogue just to show what could be possible with a little bit of imagination.

Having come across something similar in Japan it was quite easy to decide the layout which you can see on the right. The figure is an unbased Perry cavalry samurai..

I decided to make the torii from scratch (which they all are) because the ones in the catalogue are already based and I wanted this one integral to the base. Most of these rural shrines have a gravel path leading up to them but I wanted this one to have a disheveled look so some of the border stones are slightly out of place.

This shot shows the final layout and it has also been sanded (sieved builders sand) and covered in thin brown ink. the roof for the moment is separate but everything else is stuck down (a slight mistake on my part but not too troublesome).

Here we have a shot of the basic greenery on the base. I decided to go for three different types of 'growie' for maximum effect and a slightly overgrown appearance.

All the parts were painted in the same way as the catalogue items, I didn't think much point in painting them differently.

The path was drybrushed with various greys and the earth with beiges and tans, building up a nice varied tone throughout.

The growies were added with thinned down white wood glue that was randomly brushed on, the growies being scattered on at three different times, letting each one dry before putting the next one on.

There are a few places where the growies have grown onto the path (hopefully you can see them) and I've also put a few tall grass clumps on just to add to the variation. The trees are old ones from work.

I did think of using some Silfor but it seems everyone is doing it now and I wanted something slightly different. Below we have the beauty shots and there are quite a few because I'm quite pleased with this one :-) I have a few other things of this nature planned but time will tell...


ttfn