I’ve been asked by Dave Imrie to make him a small fortified manor house that he can use in his War of the Roses games (which I’m sure you’ve seen photos of on various platforms).
The basic layout and initial wip photos are below. I’ve been given a fairly free reign with the design and have used various elements from numerous such houses across the country.
The main hall is supposed to be originally Norman with a few changes (windows and such) and then there’s a timber framed addition. The gatehouse will be timberframed as well in the style of Stoksey Castle (Dave’s particular request).
For now it’s all been cut by hand from mounting card and the various block work parts are sheet styrene. The timbering has been started and the whole thing will be painted once it’s done.
Roof tiles are the cards ones I sell on my website and they are a blessing as they save so much time (I used to stick tiles on individually).
I’m going to be 3D printing most of the stone windows but there’ll be a post on that specifically in a week or so.
ttfn
This where all my hobby and OSHIRO items will be posted. It's an eclectic mix but hopefully there's a bit of something for most people (if not everyone :-).
30/05/2018
20/05/2018
New OSHIRO releases
Some of you might have seen these before but I'm putting them here for completeness.
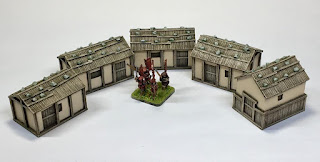
I've got several new releases on the website and available. 15mm village buildings, 28mm Chinese building and 28mm Chinese walls. Have a look and drop us an email via the website, although there's a couple of days wait at the moment due to the amount of orders being processed (which isn't a bad thing).
Got more planned of course but these should hopefully keep you going for now :-)
First off are the 15mm Japanese village buildings. They are following the 28mm village range and will be added to in the next couple of months JV15-01 to 05. 15mm Japanese village buildings
Next up are the new Chinese 28mm buildings (I'm working on 15mm versions at the moment) CR04, CR05 and CR06. 28mm Chinese buildings
And then finally we have the Chinese wall sections. Most of them will eventually have ruined versions and I'm also working on the 15mm versions at the moment. 28mm Chinese walls
ttfn
I've got several new releases on the website and available. 15mm village buildings, 28mm Chinese building and 28mm Chinese walls. Have a look and drop us an email via the website, although there's a couple of days wait at the moment due to the amount of orders being processed (which isn't a bad thing).
Got more planned of course but these should hopefully keep you going for now :-)
Next up are the new Chinese 28mm buildings (I'm working on 15mm versions at the moment) CR04, CR05 and CR06. 28mm Chinese buildings
And then finally we have the Chinese wall sections. Most of them will eventually have ruined versions and I'm also working on the 15mm versions at the moment. 28mm Chinese walls
ttfn
17/05/2018
Old school Guard
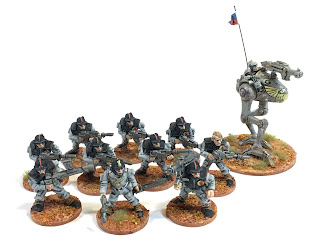
These are quite possibly are some of my favorite figures. Copplestone Rogue Trader Imperial Guard!
I've collected quite a few over the years and finally feel confident enough to paint them. So far I've got one squad, a rhino, a sentinel and a commissar. Not a massive amount so far but there's plenty in boxes just waiting to get paint o them :-)
I've gone for one of the original looks, grey fatigues, black flak armour and standard boltgun grey for the weapons. The weapons on the troopers have been changed for the modern Cadian plastics as I'm not keen on the original lasguns (too eighties, if that makes sense). The sentinal and rhino have been done in codex grey and have had suitable weathering. there's also a modern gun on the rhino and I'm thinking of losing the lascannon on the sentinel and changing it for something smaller (I've got three sentinels but no mutilasers for them).
Figure bases are red to try and match my Mars terrain as I fancied something a bit different rather than the usual green.
14/05/2018
Another AWI house
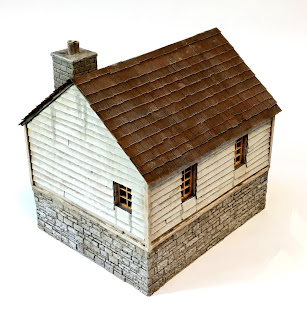
Last September I showed a little house I made on commission of a typical house for the AWI. Well, the commission is continuing with several more and here for now is the second.
I was given a fairly free reign with the designs but supplied with a couple of images to help. This one I decided to have raised up on a false basement (maybe the ground was too hard to dig into) and to have a slightly squarer footprint than the first.
The basic box, with the windows and door cut in, was made. The lower half was clad in Wills styrene sheeting and the upper half hard card slats added for the clapboard. The roof was made from my own roof tile sheets. The stairs into the house were assembled from individual blocks to help give the more random look of being home made.
Painting was fairly simple. A quick spray of off white for the clapboard, a dark tan for the stone work and a reddy brown for the tiles. There were all inked and then dry brushed in slightly lighter colours. Some weathering was applied to represent water runs in key places.
ttfn
11/05/2018
Old school Empire
I have a rather large soft spot for the initial GW empire range and also for the Jes Goodwin Skaven figures (skaven to follow later when I've completed more of them
These also go along with the Empire buildings I'm making and the idea is to play with an altered version of Muskets and Tomahawks (which is the go to rules set in the group that I play with) which will include some simplified magic.
The first photo is of what I had painted years and years ago so recently I've started to tart them up, re-based them and given a good coat of matt varnish
Some artillery (I think I've got another 12 guns in various guises somewhere)
And here is the Elector Count of Nordland, Jakob von Sternheim
These also go along with the Empire buildings I'm making and the idea is to play with an altered version of Muskets and Tomahawks (which is the go to rules set in the group that I play with) which will include some simplified magic.
The first photo is of what I had painted years and years ago so recently I've started to tart them up, re-based them and given a good coat of matt varnish
So far I’ve only done the artillery and Elector Count but the other figures aren’t far off and I’ll show them soon once they are complete. I’ve also got a couple of character figures that are done but need rebasing that are in a figure box somewhere.
Some artillery (I think I've got another 12 guns in various guises somewhere)
And here is the Elector Count of Nordland, Jakob von Sternheim
07/05/2018
Limehouse - The Figures Part One
So, for a game to work you need figures (an element I sometimes forget lol) but this time I've got enough for at least one side. One of my gaming friends has got a large collection of Victorian figures that we will be using until I get enough done with the right bases.
The main gang is from North Star figures and is the Brick Street Commune. I'll be using them as Bibblys Bashers that have come down from the north country to the big smoke to cause a ruckus :-)
And then we have some civvies to populate the board and to get in the way. Foundry figures for the most part but I'm not sure about the copper.
And finally we have some individual shots of figures for forthcoming gangs. Each of the figures below will eventually have a 'gang' of their own so I can field multiplayer games.
First off is Allan Bino in wolf form (can't remember where he's from).
Then we have Count Imgonar Tsukyablud from the far reaches of Eastern Europe (private sculpt)
And finally for now Jack Atlantic, veteran of the waves (North Star figure for LAF members)
More to follow as and when I get them done.
ttfn
04/05/2018
Limehouse - The Terrain, Part Two
Onto the buildings.
Looking at period photos of the less salubrious areas of London it’s surprising how many different building styles there were and how ramshackle it could be. Obviously there is limited space on a 300mm square board but I’ve tried to go for an eclectic mix.
The first build was a clapboard warehouse/house, the footprint of which was very close to the Victorian terrace houses I produce to help the modularity. The clapboard is very thin balsa wood over a card box and the roof is from the roof tiles I make. The roof is removable because we are thinking of having limited internal access (if a figure can be placed somewhere in the building it is considered in the building for simplicities sake). It was sprayed darkish brown and heavily drybrushed up along with weathering by pastels and inks.
The next building is one of my terraced houses and has had no extra work done to it. The colour is something different as I’ve tried to go for London Stock (a beigey sort of tan colour) this was inked and weathered as before.
On the other side is a thin and tall warehouse that was drawn and made to fit the tile but it will most likely end up in the catalogue after a few tweaks. Again, I tried the London stock colour but a slightly different tone and weathered the usual way (inks and pastels). The lights are from china and I originally thought they were too big but after looking at a fair few period photos, street lamps could be a sizeable affair. There is a limited interior for this one as well but it has platforms behind the windows instead of full floors (as it's so thin it can be a squeeze to get a hand down there). The lights are powered by two watch batteries and I need to sort out a simple switch for them as at the moment they are connect by pressure when the building is sat on the tile.
Next up will be some figures.
ttfn
Subscribe to:
Comments (Atom)


