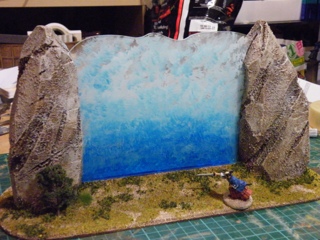
As part of a larger commission I was asked to produce some elements of fantasy terrain leaning towards the orient, not too fantastical but just enough to make pele go 'Ooo, that's different'... Well, that's the idea anyway.
The first idea that popped into my head was a Gateway to Heaven, but something that's seen better days and could have been lost in the wilds somewhere. Keeping it simple was the order of the day and I though of two dolman and some steps leading up to nothing but having the ability of being able to place a portal in-between them.
The photos show the progress in sequence and not in my usual format because I'm using 'Blogger' for the iPad, it means that I can post more posts without having to turn the desktop on (a struggle at the best of times) but at the moment it seems that the only choice for photos is to have them at the end, hopefully something that will be sorted soon.
On to construction. I started with a rounded base about 300mm x 130mm and two basic lumps of blue foam about 150mm high and 70 odd in diametre. These were carved into a pleasing dolman type shape and were distressed by dragging a small saw across at various angles creating cracks and fissures in the rock. When this was done they were coated first in a rough textured paint and then a finer one to bring the details together a bit.
The steps were carved from a material called foamex although I believe it's also known as foamed pvc. The carving of the stairs took some time as I wanted them to be random and weather worn, hopefully this has occurred.
The base itself was given a layer of filler to meet the stairs up the sides and at the back. A coat of Tamiya tan matt spray was sprayed over the whole model as a base coat. The rocks were inked and washed with various colours and drybrushed up to almost white.the stairs were just washed with a sepia ink and drybrushed the same as the rocks.
Then sand was applied to the base and treated in the normal way in which it's coated with a layer of dark brown ink and then brought up to quite a light earth colour with several drybrushes. Three different types of flock were added once this was all dry and some suitable plants and grass was also placed in various positions.
I did think of placing thick white rope around the dolman, similar to the type of rope you see around certain trees and rocks in Japan but I'll let my client decide that.
The final touch was the actual portal itself. Suffice to say I'm not 100% convinced by it but it does seem to work, after a fashion... I also highlighted the dolmen with a touch of blue/white to give the impression of a glow emanating from the portal. I might have another attempt and spray it at work to get a more subtle effect but again, I'll let the client decide.
On to the photos (the bit you've probably been waiting for ;-)
This where all my hobby and OSHIRO items will be posted. It's an eclectic mix but hopefully there's a bit of something for most people (if not everyone :-).
06/01/2013
03/01/2013
2013
May I first wish everyone a happy and prosperous New Year for the coming months and may it be filled with gaming goodness!
Just one picture for this post as I have a list of about six different postings that I want to share over the coming weeks...
The picture might not make much sense unless you are following the progress on the Lead Adventure Forum, it's going to be made for Salute and is the city of New Victoria on Mars around 1889... More to follow later.
ttfn
Just one picture for this post as I have a list of about six different postings that I want to share over the coming weeks...
The picture might not make much sense unless you are following the progress on the Lead Adventure Forum, it's going to be made for Salute and is the city of New Victoria on Mars around 1889... More to follow later.
ttfn
25/11/2012
Continuing Japanese projects
Once again I apologise for the tardiness with my posting of late, I jujst seem to be far too busy to be able to post anything :-( But at there's one now :-)
I've got several Japanese projects on the go at the moment (and other period as well) and I'll put some pictures up below of some of these. The village boards are just about done, they need a few bushes, accoutrements and veggies to go on and they'll be done. The building base with the two story shop needs a small table out the front with wares on it and then that's complete. Some of the photos are typically out of focus but I'm a modelmaker not a photographer and I'll leave it to my wife to take the proper ones :-)
I hope to have another post during the week showing other projects but we'll have to see...
ttfn
I've got several Japanese projects on the go at the moment (and other period as well) and I'll put some pictures up below of some of these. The village boards are just about done, they need a few bushes, accoutrements and veggies to go on and they'll be done. The building base with the two story shop needs a small table out the front with wares on it and then that's complete. Some of the photos are typically out of focus but I'm a modelmaker not a photographer and I'll leave it to my wife to take the proper ones :-)
I hope to have another post during the week showing other projects but we'll have to see...
ttfn
10/11/2012
Oh dear, oh dear
Well, I left this for far too long I'm afraid and I apologise for it. It always seemed that there was something else to do and the desktop is really getting slow...
Anyway, I thought I would post some select photos from my recent trip to Japan. I've got over 200 from this trip alone but I won't bore you with them all ;-)
Not much else to say really so I'll let you enjoy them. Basic info below each one or group.
ttfn
Anyway, I thought I would post some select photos from my recent trip to Japan. I've got over 200 from this trip alone but I won't bore you with them all ;-)
Not much else to say really so I'll let you enjoy them. Basic info below each one or group.
ttfn
| The tenshu of Kumamoto-jo |
| Corner tower and the long wall |
| Another view of the tenshu |
| One of the only roofs in Japan with a straight profile on a corner tower |
| Myself and a very nice chap who was quite willing to have a chat |
| Underneath the 'palace'. All reconstructed but impressive none the less |
| One of the gate towers on the east side |
| One of the main gate and wall sections leading inside |
| A superb long wall on the western side of the castle |
| And finally, a rather embarrassing 'dance' group... |
16/09/2012
Meanwhile, back in Japan...
I've done a bit more on the samurai house and have made a few decisions about the roof. Also in this post there are a few other Japanese items that I've been (or still am) working on.
The shoji are done as is the woodwork, basic groundwork and wall panels. The shoji were laser cut from thin acrylic and then thin paper (from Japan) was applied to the rear with very thin superglue. This allowed the light to come through and for the whole sheet to be stuck without any lifting.
The groundwork was painted in the normal way and when the fencing is in I'll apply the 'growies'. The photo to the left looks a bit dark but you should get an idea of the wood colour and shoji together.
The panels were painted with masonery paint first and then just highlighted with pure white. This gives a pleasing subtle effect and isn't too overpowering.
The woodwork was painted with my standard brown and drybrushed with three levels, each getting progressivly lighter.
For the roof I will be reverting to normal roof tiles as I'm not comfortable with the thatch experiments I've made so far. I'll still be putting lighting into the roof space and the effect with the shoji should be quite an eyeopener.
The roof style will be quite low, hipped but with a small gable at each end. I'll make a mock up first to make sure that the angles and tile spacing works.
The stones under the veranda were painted a grey/green/brown and will get a light highlight.
The fence will be made in the same way that pretty much all the fences on my Japanese works have been done, there will also be a simple gateway.
I'm still struggling with the tate but shouldn't be too far off from getting them right, I'#m also working on a few interior details that I might cast and have on the website.
One slight annoying thing is that the base plate has warped ever so slightly on the underside (even though it's acrylic). I can sort it though.
In preperation for Salute next year I'm making more building bases to enlarge the town that I had at this years Salute. This one is using the two story shop from the catalogue (JP08) and the soon to be released small kura.
The reason why the groundwork is not done yet is because the small kura is actually the master that will be getting moulding very soon, it's not stuck down and is only there for the photo. I'm debating whether to have a small field or even a rice paddy at the back, or maybe something else...
I'm going to put a couple of small tables out the front with some produce on display but to what this might be I haven't decided yet.
I mijght add a gate to the side entrance but have it as an openwork bamboo one instead of a solid wooden one.
To finish off for today I've got two repeat models that I've made for a very nice chap recently (in fact, they'll be in the post tomorrow) who liked the originals.
It's a roadside signpost and a rural toilet. Basically the same as last time but with a slightly different profile for the toilet. Lastly I've made a planted paddy field. Quite time consuming but I think the effect is worthwhile. I'll leave you with a few final picutes.
ttfn
The shoji are done as is the woodwork, basic groundwork and wall panels. The shoji were laser cut from thin acrylic and then thin paper (from Japan) was applied to the rear with very thin superglue. This allowed the light to come through and for the whole sheet to be stuck without any lifting.
The groundwork was painted in the normal way and when the fencing is in I'll apply the 'growies'. The photo to the left looks a bit dark but you should get an idea of the wood colour and shoji together.
The panels were painted with masonery paint first and then just highlighted with pure white. This gives a pleasing subtle effect and isn't too overpowering.
The woodwork was painted with my standard brown and drybrushed with three levels, each getting progressivly lighter.
For the roof I will be reverting to normal roof tiles as I'm not comfortable with the thatch experiments I've made so far. I'll still be putting lighting into the roof space and the effect with the shoji should be quite an eyeopener.
The roof style will be quite low, hipped but with a small gable at each end. I'll make a mock up first to make sure that the angles and tile spacing works.
The stones under the veranda were painted a grey/green/brown and will get a light highlight.
The fence will be made in the same way that pretty much all the fences on my Japanese works have been done, there will also be a simple gateway.
I'm still struggling with the tate but shouldn't be too far off from getting them right, I'#m also working on a few interior details that I might cast and have on the website.
One slight annoying thing is that the base plate has warped ever so slightly on the underside (even though it's acrylic). I can sort it though.
In preperation for Salute next year I'm making more building bases to enlarge the town that I had at this years Salute. This one is using the two story shop from the catalogue (JP08) and the soon to be released small kura.
The reason why the groundwork is not done yet is because the small kura is actually the master that will be getting moulding very soon, it's not stuck down and is only there for the photo. I'm debating whether to have a small field or even a rice paddy at the back, or maybe something else...
I'm going to put a couple of small tables out the front with some produce on display but to what this might be I haven't decided yet.
I mijght add a gate to the side entrance but have it as an openwork bamboo one instead of a solid wooden one.
To finish off for today I've got two repeat models that I've made for a very nice chap recently (in fact, they'll be in the post tomorrow) who liked the originals.
It's a roadside signpost and a rural toilet. Basically the same as last time but with a slightly different profile for the toilet. Lastly I've made a planted paddy field. Quite time consuming but I think the effect is worthwhile. I'll leave you with a few final picutes.
ttfn
25/08/2012
War on Mars!
Todays post is an actual battle report! Yes, I finally got some gaming in and took some photos :-) The arrangement will be slightly different than my normal posts as it seems easier to do it this way (and I'm not very good at 'narrative').
The basic set up was a four by four table, using some of the boards from the Salute 2012 game with a small mining encampment and a docked neff. Two units of Martians (using our new figures) were dropped off by skiff and raided the camp which was defended by the miners and a small detachment of the Naval Brigade.
On to the photos...
The basic set up was a four by four table, using some of the boards from the Salute 2012 game with a small mining encampment and a docked neff. Two units of Martians (using our new figures) were dropped off by skiff and raided the camp which was defended by the miners and a small detachment of the Naval Brigade.
On to the photos...
The Martian force
The thin blue line
The Martians land on the docked Japanese neff 'Kaze' and start to decimate the crew
After killing the crew, the Martians decend to the ground and advance towards the enemy
Fierce fighting ensues but the British line holds
The Martian Warleader tackles Lt A A Milne of the Naval Brigade and takes him down
The raid was to of no avail as the Martians were soundly beaten but an overhead skiff noted the Earther ways of battle and another warclan is being prepared. They will return...
Not the best selection of photos but it conveys what happened. I'm actually pleased with some of the really red looking ones as it looks like a Martian sunrise, I didn't do anything, that's just how they came out. We'll be playing again on Wednesday and will have more troops this time. The rules used were T+T (Triumph and Tragedy) and although no real VSF contraptions were used they seemed to work very well. A few alterations for the Martians will be implemented for the next game along with some basic flying rules for neffs and skiffs. I can't wait !!!
ttfn
Subscribe to:
Posts (Atom)